

Learn how to teach bioluminescence with this complete KS2 science lesson plan, including video demonstrations, worksheets, and hands-on activities.
Bioluminescence is one of those science topics that instantly hooks learners, but it works best when ideas are carefully built step by step. This lesson uses a short video, two simple demonstrations, and a structured worksheet pack to help pupils understand why animals glow and how this helps them survive. The lesson links directly to KS2 - KS3 science learning on Light, Living Things and Their Habitats, Animal Adaptation and Evolution.
Step one: Introduce the idea with real animals
Start by watching the video 5 Coolest Animals That Glow.
As pupils watch, give them the Bioluminescence Vocabulary worksheet. They listen for words such as lure, predator, camouflage, and bioluminescence and match them to their meanings
Why Do Animals Glow KS2 Science…
This keeps attention focused and ensures scientific language is introduced early.
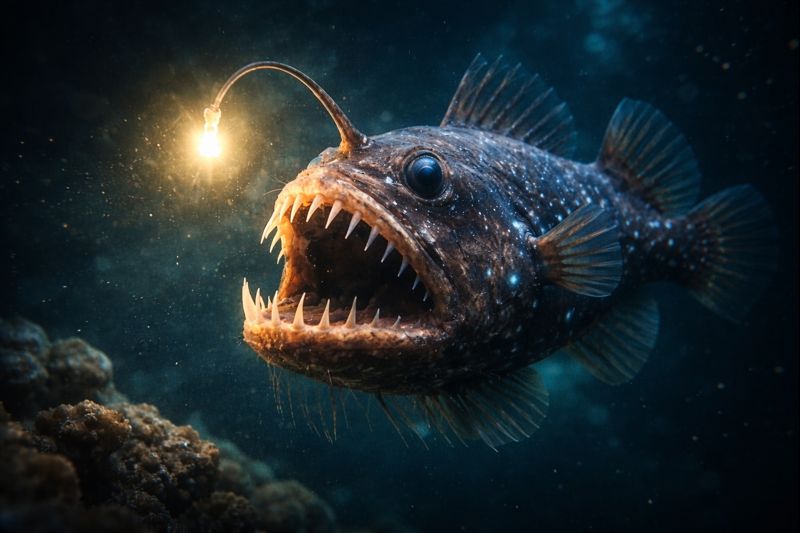
After the video, use the Why Do Animals Glow? explanation sheet to discuss four examples:
- Anglerfish
- Squid
- Jellyfish
- Coral
Pupils explain how glowing helps each animal survive, using the provided word bank
Step two: Show that glowing is chemistry, not heat
Next, introduce the idea that bioluminescence is caused by a chemical reaction.
Using a glow stick in a darkened room, explain that:
“Two chemicals are mixing and releasing energy as light.”
Placing one glow stick in warm water and one in cold water shows that the surroundings can change how bright the light appears. This supports the glossary definition of bioluminescence pupils have already encountered on the vocabulary worksheet

The key takeaway for pupils is simple:
Animals can make light because chemicals in their body mix.
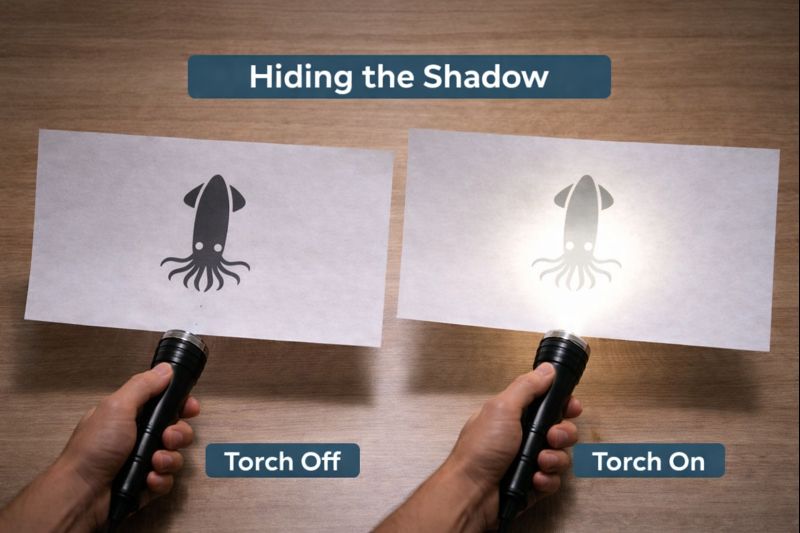
Step three: Explain how squid use light to hide
To support the squid example from the video and worksheet, demonstrate counter-illumination.
Using a cardboard squid and a torch:
- First show the dark shadow created when light shines from above
- Then add a small light underneath the squid
- The shadow fades, showing how light can be used to hide
This directly reinforces the squid explanation pupils watched in the video.
Step four: Consolidate with structured thinking tasks
The worksheet pack further secures understanding through two carefully sequenced activities:
- Invisibility or Traps? debate sheet, where pupils choose whether squid camouflage or anglerfish lures are more effective and justify their answer (pages five and six)
- Design a Glowing Animal, where pupils invent their own animal, choose how it glows, and label the glowing body parts
These tasks move pupils from recalling information to applying ideas about adaptation.
Step five: Apply through imagination and writing
The lesson finishes with the Anglerfish writing task, where pupils write from the perspective of an Anglerfish in the deep ocean. This strengthens understanding of habitat, predators, prey, and survival strategies while supporting science-linked literacy
Download the full worksheet pack
All worksheets, model answers, and activity pages are included in the Why Do Animals Glow? KS2 Science Pack.
👉 Download the complete resource collection here:
Comments ()